How to straighten and clean up a scanned PDF
- Select or drop the scanned PDF or image.
- Detect the straightening angle and upright direction, correct perspective and choose the scan appearance.
- Download the adjusted PDF or PNG, then run OCR PDF if you need searchable text.
Worked example: straightening a crooked two-page scan
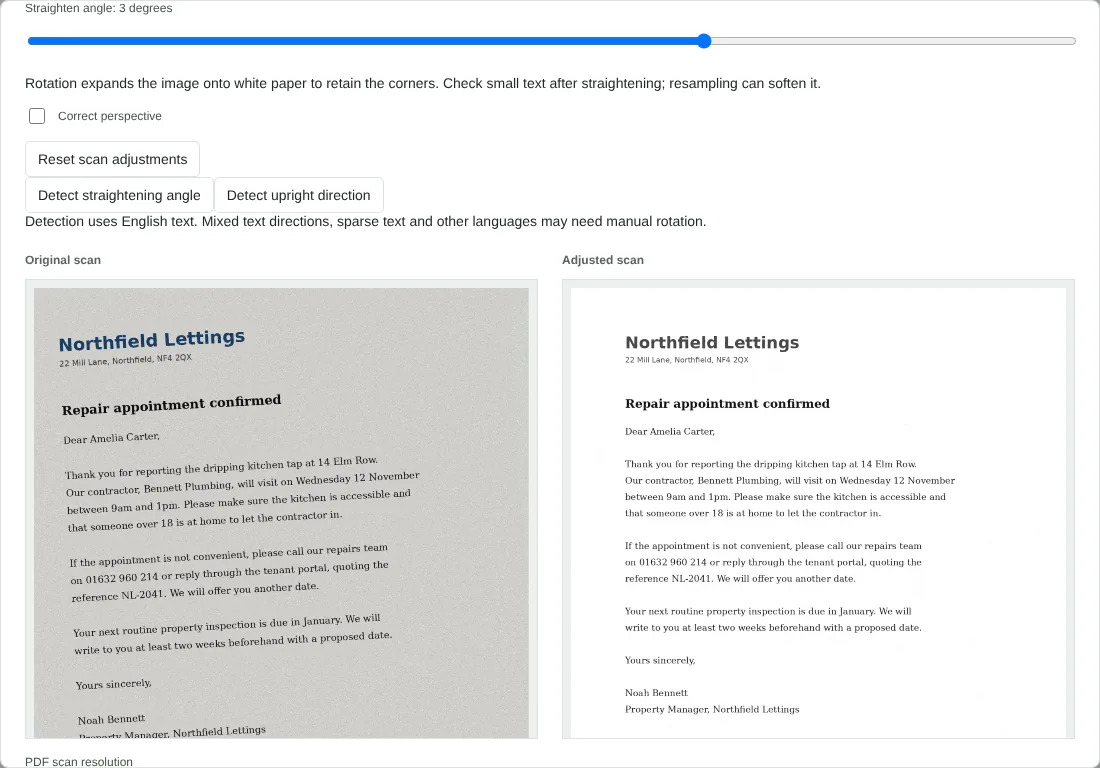
In this test we used a fictional 2-page scanned PDF of 792 KB: a letting agent's repair appointment letter and a meter readings form, each scanned at 150 dpi onto A4 with grey paper and a slight tilt. We made the test scans ourselves, so the tilt was known: 3 degrees on page 1 and 2 degrees the other way on page 2.
On each page, Detect straightening angle suggested exactly the right correction, 3 degrees and -2 degrees, and Apply suggested angle levelled the text. Download combined scan PDF gave adjusted-scans.pdf with 2 pages and no searchable text, at 4.0 MB. We then switched on Greyscale and set Paper white level to 200 on both pages, which turned the grey paper white, and exported again: this time the file was 1.4 MB.
Straightening turns the page onto a slightly larger white canvas so the corners are not cut off. The output pages measured 639 x 872 points and 625 x 863 points, a little larger than A4 at 595 x 842.
Why a cleaned-up scan can be larger than the original
Scanners and scanning apps often save pages as JPEG. This tool renders each page, applies your changes and stores the result as a lossless PNG image in the new PDF. Nothing more is lost in this step, but the file is often larger than the original scan. In our test the colour result was about five times the original size, and greyscale with a white paper level brought it down to 1.4 MB, still larger than the 792 KB original. Running that greyscale copy through Compress PDF with the Balanced preset reduced it from 1,353,795 to 182,156 bytes.
The PDF scan resolution setting controls how much detail is kept: 96 dpi for on-screen reading, 150 dpi for everyday use and 300 dpi when small print must stay sharp. Lower resolutions give smaller files. Changing the resolution clears pages you have already prepared.
Straighten, rotate or correct perspective: which to use
Detect straightening angle reads English text on the page and suggests a correction of up to 10 degrees. It needs a few lines of clear text. For pages with little text, or text in another language, use the Straighten angle slider, which moves in steps of 0.1 degrees between -10 and 10, and compare the two previews. Detect upright direction checks the page at 0, 90, 180 and 270 degrees and suggests which way up it belongs, and the rotate button turns the page 90 degrees clockwise at a time.
Correct perspective is for photos taken at an angle, where the page looks like a trapezium. Tick it and move the four corners onto the corners of the paper, by dragging or by typing positions as percentages. Only the area inside the corners is kept, so the desk or background disappears. Check the whole page afterwards for stretched or missing edges.
Tidying the tone page by page
Paper white level turns everything lighter than the chosen value pure white, which removes grey or yellowed paper. Black level does the same at the dark end, making text blacker. Brightness and contrast apply to the whole page. Pushed too far, these settings can make light pencil, signatures and stamps disappear, so compare the original and adjusted previews as you go.
Settings are kept separately for each page. Download combined scan PDF processes every page and applies no adjustments to pages you have not changed, while Download adjusted PDF and Download adjusted PNG save only the page on screen. Closing the dialog discards your adjustments, and your original file is never changed.
Good to know
- Straight, high-contrast pages give much better OCR results.
- Greyscale and contrast settings can make faint scans clearer. Pages are stored losslessly, so the result can be larger than the original scan. Compress PDF can reduce it afterwards.
- Each page can be adjusted individually.
Why your files stay on your device
RedactNinja PDF runs in your web browser. When you choose a file, it is read and processed on your own computer, tablet or phone. It is not uploaded to a server, so there is nothing for us to store, read or delete afterwards.
You can check this yourself: open your browser's developer tools, select the Network tab and use a tool. Your document does not appear in the requests. The editor also loads no advertising or analytics code. How to check that nothing is uploaded.
Free, with no sign-up and no watermark
Every tool is free to use without an account. Nothing is added to your documents, and there are no daily task limits. Large files depend on your device's memory, so very big scans may take longer on older machines.
Questions about Clean up scans
Can it fix a photo taken at an angle?
Yes. Use Correct perspective to square up the page corners.
Can I make a scan black and white?
Choose the greyscale appearance and adjust contrast.
Will it improve OCR?
Usually, yes. Straight, clear pages are recognised more accurately.
Are my files uploaded?
No. The tool runs in your browser and processes the file on your device. Nothing is sent to a server.
Is it free?
Yes. There is no account, no watermark and no daily limit.
Further reading
Related tools
All PDF tools
Organise
- Merge PDF
- Split PDF
- Organise PDF
- Rotate PDF
- Delete PDF pages
- Extract PDF pages
- Crop PDF
- Resize PDF pages
- Batch PDF
Convert from PDF
- PDF to Word
- PDF to Excel
- PDF to PowerPoint
- PDF to JPG
- PDF to PNG
- PDF to text
- PDF to Markdown
- Extract images
- PDF to PDF/A
Convert to PDF
Edit and sign
- Edit PDF
- Edit PDF text
- Find and replace in PDF
- PDF comments list
- Fill PDF form
- Sign PDF
- Draw on PDF
- Watermark PDF
- Add page numbers
- Bates numbering